温馨提示:本案例图文并茂,代码齐全(包括前端)大家只需要跟着文章一步步学习即可实现。想要一步到位直接获取代码的同学,请关注微信公众号「哈喽沃德先生」回复 ordertimeout 即可。
大家平时应该都有过网上购物、看电影、点外卖的经历,有时候也会因为某些原因导致商品不想要了,看电影去不了了,外卖不想吃了等情况发生,此时我们无需做其他操作,即使已经下单,只要不付款即可,过段时间该订单则会自动取消。
行内话讲,这叫做业务延迟处理或延迟任务,即业务有“在一段时间之后,完成一个工作任务”的需求。既然这个功能这么重要,身为一名合格的程序员必须搞清楚其背后的实现原理。安排!
本案例分上下集两篇,该文为第二篇,将通过 Spring Boot + RabbitMQ + Vue 实现一个简易版的订单超时处理系统,方便大家理解其背后的原理。上一篇详细分析了延迟任务的各种解决方案,以及 RabbitMQ 是如何实现延迟任务处理的。上一篇链接:为什么我推荐你使用 RabbitMQ 实现订单超时处理(一)

案例分析
无论是电商购物、购买电影票、还是点外卖,相同的环节都是下单即生成订单,然后唤起支付系统进行支付。这里面肯定会遇到订单超时(下单以后未支付,指定时间内取消订单)的问题,且面试中也会被经常问到。
如果单拿订单超时这个案例来说,核心逻辑无非以下几点:
- 用户选择心仪的商品以后提交订单
- 后台生成订单相关数据并入库(订单编号、订单关联商品、订单关联用户、订单状态、支付状态、发货状态等)
- 前台进入支付界面
- 用户放弃支付且未取消订单
- 通过延迟任务实现订单超时处理自动关闭订单(修改订单相关数据,修改状态,返回库存等)
其实除了订单超时场景之外,以下场景同样可以使用延迟任务来解决:
- 新用户注册后,3 天内没有登陆,则进行短信提醒
- 抖音用户 3 天未上线,从该用户关注列表中随机选择一个最新作品并发送短信撩动
- 手机远程遥控智能设备 1 小时后启动
- 订单在 15 分钟之内未支付,则自动取消
- 新创建的店铺,10 天内没有上传商品,则自动发送消息提醒
- 用户发起退款,3 天内没有得到处理,则通知相关运营人员
- 预定会议后,在预定的时间点前 10 分钟通知相关人员参加会议
- ……
上一篇我们带大家详细分析了延迟任务的各种解决方案,以及 RabbitMQ 是如何实现延迟任务处理的。上一篇链接:为什么我推荐你使用 RabbitMQ 实现订单超时处理(一)
这一篇我们结合实战场景,通过 Spring Boot + RabbitMQ + Vue 实现一个简易版的订单超时处理系统,方便大家理解其背后的原理。安排!
准备工作
环境
- RabbitMQ:3.8.14
- Spring Boot:2.4.4
- JDK:11.0.10
- 前端:移动端商城模板 + Vue,文中配有详细代码
- IDE:IntelliJ IDEA
MySQL
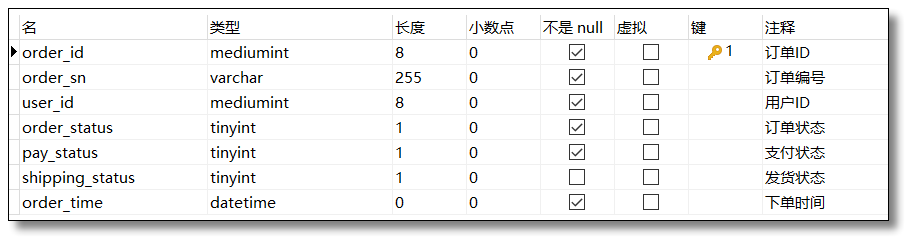
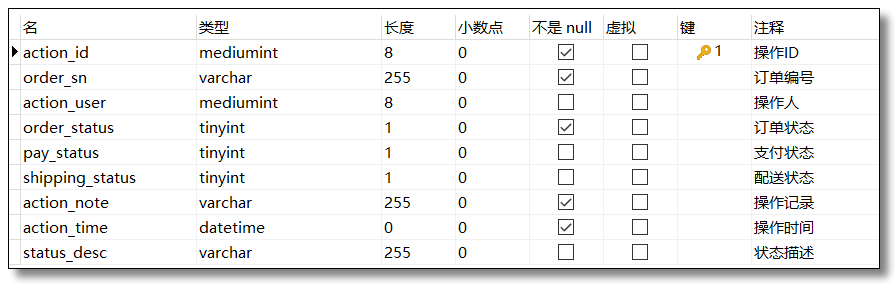
实际开发时表字段非常多,这里根据订单超时业务场景简单构建以下表结构。
订单表 order
订单操作表 order_action
SQL
 1
 2
 3
 4
 5
 6
 7
 8
 9
10
11
12
13
14
15
16
17
18
|
SELECT
	o.order_id,
	o.order_sn,
	o.user_id,
	o.order_status,
	o.pay_status,
	o.shipping_status,
	o.order_time,
	oc.action_id,
	oc.action_user,
	oc.action_note,
	oc.action_time,
	oc.status_desc
FROM
	`order` o
	LEFT JOIN order_action oc ON o.order_sn = oc.order_sn
WHERE
	o.order_sn = "1373952309003948032";
|
RabbitMQ
为了方便省事,本文采用单节点 RabbitMQ。
Spring Boot
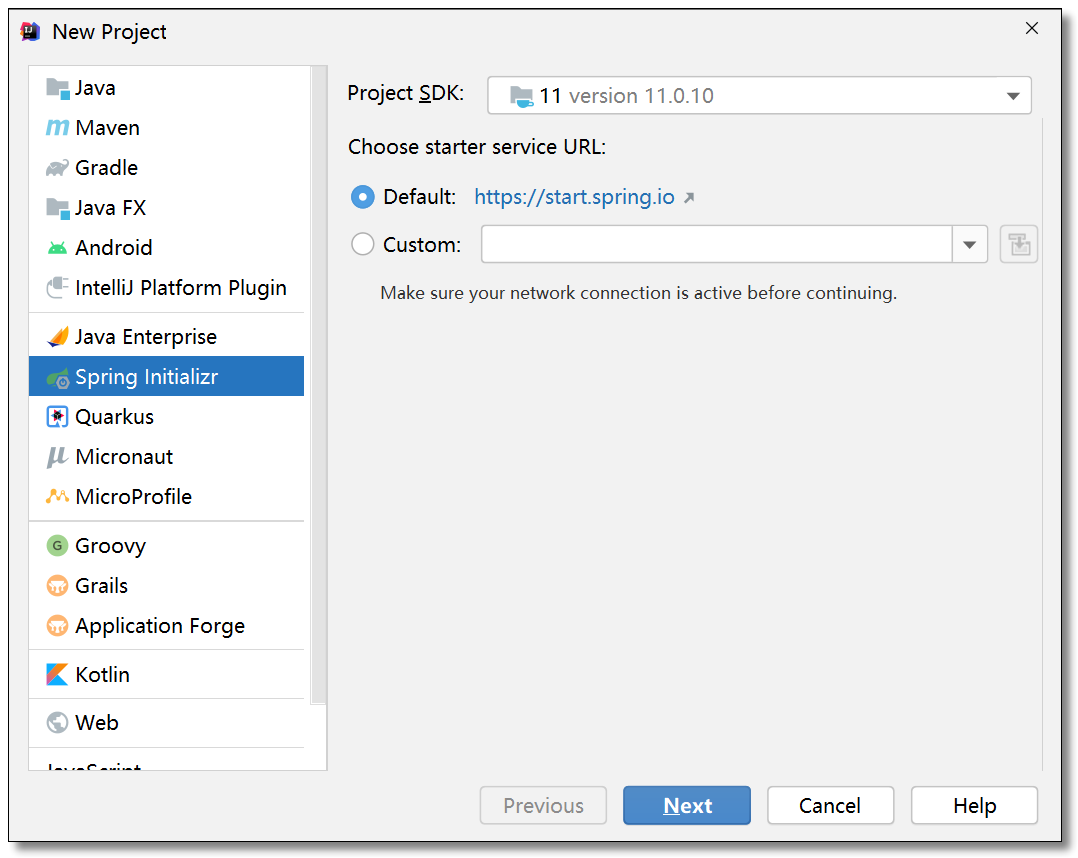
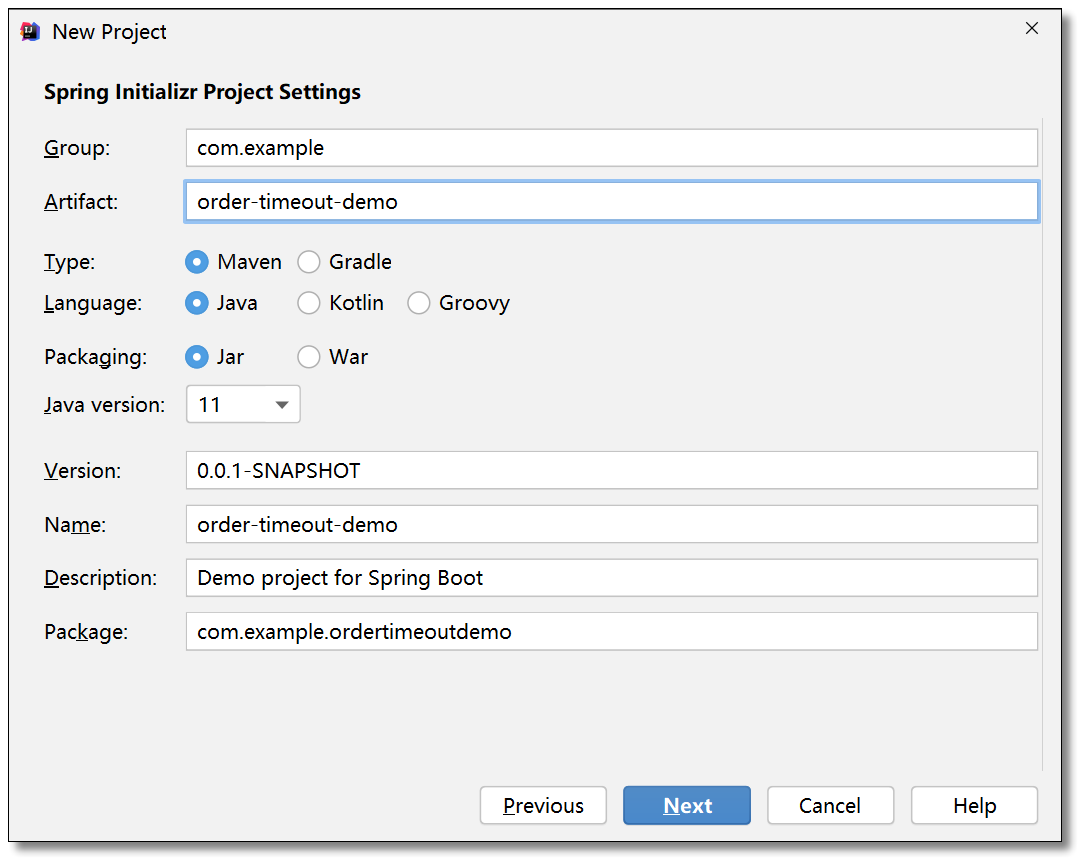
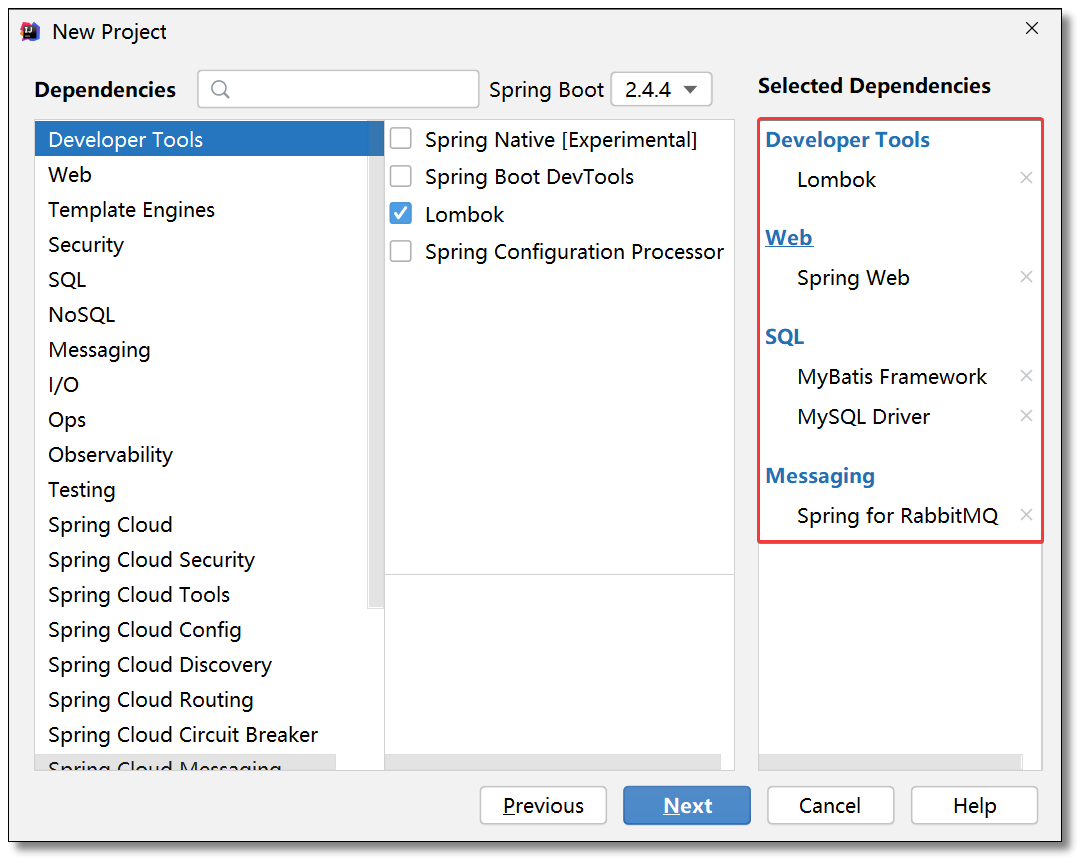
创建项目
使用 Spring Initializr 初始化 Spring Boot 项目,添加 Spring Web,Spring RabbitMQ,Lombok,MyBatis,MySQL。
顺便再添加 hutool 工具集,方便使用工具类。
1
2
3
4
5
|
<dependency>
    <groupId>cn.hutool</groupId>
    <artifactId>hutool-all</artifactId>
    <version>5.5.9</version>
</dependency>
|
配置文件
application.yml 配置 MySQL、RabbitMQ、MyBatis 相关信息。
 1
 2
 3
 4
 5
 6
 7
 8
 9
10
11
12
13
14
15
16
17
18
|
spring:
  # 数据源
  datasource:
    driver-class-name: com.mysql.cj.jdbc.Driver
    url: jdbc:mysql://localhost:3306/example?serverTimezone=Asia/Shanghai&useUnicode=true&characterEncoding=utf8&useSSL=false
    username: root
    password: 123456
  # RabbitMQ
  rabbitmq:
    host: 192.168.10.101 # 服务器 IP
    port: 5672           # 服务器端口
    username: guest      # 用户名
    password: guest      # 密码
    virtual-host: /      # 虚拟主机地址

mybatis:
  configuration:
    map-underscore-to-camel-case: true # 开启驼峰映射
|
启动类
启动类添加 Mapper 接口扫描。
 1
 2
 3
 4
 5
 6
 7
 8
 9
10
11
12
13
14
15
|
package com.example;

import org.mybatis.spring.annotation.MapperScan;
import org.springframework.boot.SpringApplication;
import org.springframework.boot.autoconfigure.SpringBootApplication;

@MapperScan("com.example.mapper") // Mapper 接口扫描
@SpringBootApplication
public class OrderTimeoutDemoApplication {

    public static void main(String[] args) {
        SpringApplication.run(OrderTimeoutDemoApplication.class, args);
    }

}
|
前端
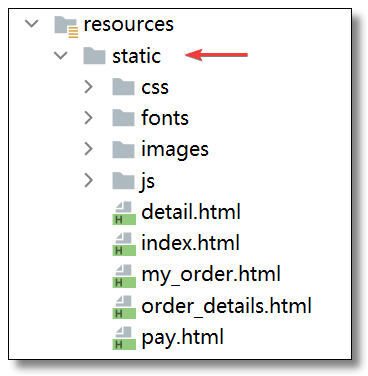
将我为大家准备好的前端资源文件添加至项目 resources 目录下的 static 目录中。
前端资源文件获取方式:请关注微信公众号「哈喽沃德先生」回复 ordertimeout 即可。
在 list.html 中使用 CDN 添加 Vue 和 Axios 免去下载文件的过程。
1
2
|
<script src="https://cdn.jsdelivr.net/npm/vue@2.6.12/dist/vue.min.js"></script>
<script src="https://cdn.jsdelivr.net/npm/axios@0.21.1/dist/axios.min.js"></script>
|
启动
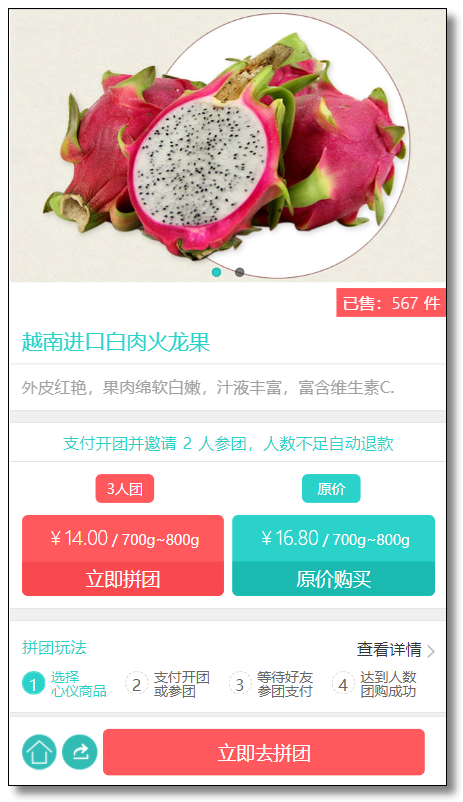
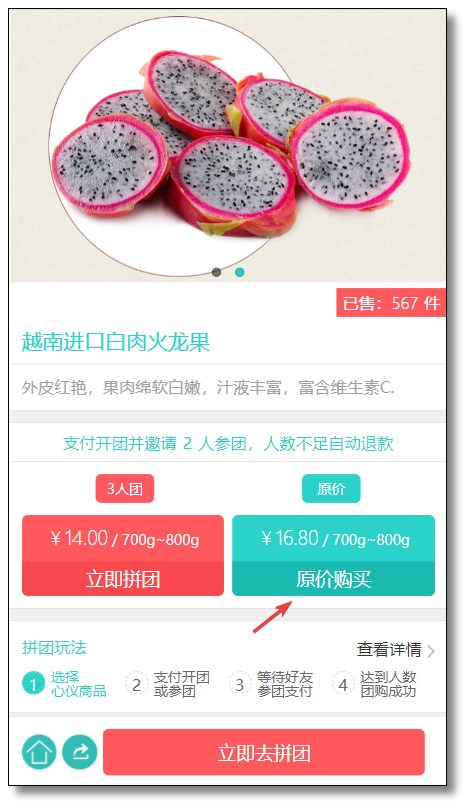
访问:http://localhost:8080/index.html 效果如下(浏览器切换成手机模式):
功能开发
我们先把新增订单、查询订单、订单详情的功能实现。
订单超时以后通过 RabbitMQ 完成订单的状态修改,并给订单操作表中添加对应的订单操作记录。
新增订单
需求说明
用户在前端界面点击购买按钮以后调用后台订单接口进行下单,前端进入支付界面。
实体类
Order.java
 1
 2
 3
 4
 5
 6
 7
 8
 9
10
11
12
13
14
15
16
17
18
19
20
21
22
23
24
25
26
27
28
29
30
31
32
|
package com.example.pojo;

import com.fasterxml.jackson.annotation.JsonFormat;
import lombok.AllArgsConstructor;
import lombok.Data;
import lombok.NoArgsConstructor;

import java.io.Serializable;
import java.util.Date;

/**
 * @author 哈喽沃德先生
 * @微信公众号 哈喽沃德先生
 * @website https://mrhelloworld.com
 * @wechat 124059770
 */
@Data
@NoArgsConstructor
@AllArgsConstructor
public class Order implements Serializable {

    private static final long serialVersionUID = 8147273155249658082L;
    private Integer orderId; // 订单ID
    private String orderSn; // 订单编号
    private Integer userId; // 用户ID
    private Byte orderStatus; // 订单状态
    private Byte shippingStatus; // 发货状态
    private Byte payStatus; // 支付状态
    @JsonFormat(pattern = "yyyy-MM-dd HH:mm:ss", timezone = "GMT+8")
    private Date orderTime; // 下单时间

}
|
OrderAction.java
 1
 2
 3
 4
 5
 6
 7
 8
 9
10
11
12
13
14
15
16
17
18
19
20
21
22
23
24
25
26
27
28
29
30
31
32
33
34
|
package com.example.pojo;

import com.fasterxml.jackson.annotation.JsonFormat;
import lombok.AllArgsConstructor;
import lombok.Data;
import lombok.NoArgsConstructor;

import java.io.Serializable;
import java.util.Date;

/**
 * @author 哈喽沃德先生
 * @微信公众号 哈喽沃德先生
 * @website https://mrhelloworld.com
 * @wechat 124059770
 */
@Data
@NoArgsConstructor
@AllArgsConstructor
public class OrderAction implements Serializable {

    private static final long serialVersionUID = 958491365899714771L;
    private Integer actionId;// 操作ID
    private String orderSn; // 订单编号
    private Integer actionUser; // 操作人
    private Byte orderStatus; // 订单状态
    private Byte shippingStatus; // 配送状态
    private Byte payStatus; // 支付状态
    private String actionNote; // 操作记录
    @JsonFormat(pattern = "yyyy-MM-dd HH:mm:ss", timezone = "GMT+8")
    private Date actionTime; // 操作时间
    private String statusDesc; // 状态描述

}
|
枚举
OrderStatus.java
 1
 2
 3
 4
 5
 6
 7
 8
 9
10
11
12
13
14
15
16
17
18
19
20
21
22
23
24
25
26
27
28
29
30
31
|
package com.example.enums;

import lombok.AllArgsConstructor;
import lombok.Getter;

/**
 * 订单状态枚举类
 *
 * @author 哈喽沃德先生
 * @微信公众号 哈喽沃德先生
 * @website https://mrhelloworld.com
 * @wechat 124059770
 */
@Getter
@AllArgsConstructor
public enum OrderStatus {

    // 0待确认 1已确认 2已收货 3已取消 4已完成 5已作废
    no_confirm((byte) 0, "待确认"),
    has_confirm((byte) 1, "已确认"),
    has_receive((byte) 2, "已收货"),
    cancel((byte) 3, "已取消"),
    complete((byte) 4, "已完成"),
    discard((byte) 5, "已作废");

    // 状态
    private Byte status;
    // 描述
    private String message;

}
|
PayStatus.java
 1
 2
 3
 4
 5
 6
 7
 8
 9
10
11
12
13
14
15
16
17
18
19
20
21
22
23
24
25
26
27
28
|
package com.example.enums;

import lombok.AllArgsConstructor;
import lombok.Getter;

/**
 * 支付状态枚举类
 *
 * @author 哈喽沃德先生
 * @微信公众号 哈喽沃德先生
 * @website https://mrhelloworld.com
 * @wechat 124059770
 */
@Getter
@AllArgsConstructor
public enum PayStatus {

    // 0等待支付 1已支付 2部分支付
    no_pay((byte) 0, "等待支付"),
    has_payed((byte) 1, "已支付"),
    part_pay((byte) 2, "部分支付");

    // 状态
    private Byte status;
    // 描述
    private String message;

}
|
OrderMapper.java
 1
 2
 3
 4
 5
 6
 7
 8
 9
10
11
12
13
14
15
16
17
18
19
20
21
22
23
24
|
package com.example.mapper;

import com.example.pojo.Order;
import org.apache.ibatis.annotations.Insert;

/**
 * @author 哈喽沃德先生
 * @微信公众号 哈喽沃德先生
 * @website https://mrhelloworld.com
 * @wechat 124059770
 */
public interface OrderMapper {

    /**
     * 新增订单
     *
     * @param order
     * @return
     */
    @Insert("INSERT INTO `order` (order_sn, user_id, order_status, pay_status, order_time) " +
            " VALUES (#{orderSn}, #{userId}, #{orderStatus}, #{payStatus}, #{orderTime})")
    Integer save(Order order);

}
|
OrderService.java
 1
 2
 3
 4
 5
 6
 7
 8
 9
10
11
12
13
14
15
16
17
18
19
20
21
22
23
24
25
26
27
28
29
30
31
32
33
34
35
36
37
38
39
40
41
42
43
44
45
46
47
48
49
50
51
52
53
54
55
56
57
58
|
package com.example.service;

import cn.hutool.core.util.IdUtil;
import com.example.enums.OrderStatus;
import com.example.enums.PayStatus;
import com.example.mapper.OrderMapper;
import com.example.pojo.Order;
import org.springframework.stereotype.Service;
import org.springframework.transaction.annotation.Transactional;

import javax.annotation.Resource;
import java.util.Date;
import java.util.HashMap;
import java.util.Map;

/**
 * @author 哈喽沃德先生
 * @微信公众号 哈喽沃德先生
 * @website https://mrhelloworld.com
 * @wechat 124059770
 */
@Service
public class OrderService {

    @Resource
    private OrderMapper orderMapper;

    /**
     * 提交订单
     *
     * @param order
     * @return
     */
    @Transactional
    public Map<String, Object> saveOrder(Order order) {
        // 订单编号
        order.setOrderSn(IdUtil.getSnowflake(1, 1).nextIdStr());
        // 订单状态 0 待确认
        order.setOrderStatus(OrderStatus.no_confirm.getStatus());
        // 支付状态 0 等待支付
        order.setPayStatus(PayStatus.no_pay.getStatus());
        // 下单时间
        order.setOrderTime(new Date());
        // 新增订单
        Integer result = orderMapper.save(order);
        // 返回结果
        Map<String, Object> map = new HashMap<>();
        if (result > 0) {
            map.put("code", 200);
            map.put("message", "订单已提交");
        } else {
            map.put("code", 400);
            map.put("message", "订单提交失败");
        }
        return map;
    }

}
|
OrderController.java
 1
 2
 3
 4
 5
 6
 7
 8
 9
10
11
12
13
14
15
16
17
18
19
20
21
22
23
24
25
26
27
28
29
30
31
32
33
34
35
36
|
package com.example.controller;

import com.example.pojo.Order;
import com.example.service.OrderService;
import org.springframework.web.bind.annotation.PostMapping;
import org.springframework.web.bind.annotation.RequestMapping;
import org.springframework.web.bind.annotation.RestController;

import javax.annotation.Resource;
import java.util.Map;

/**
 * @author 哈喽沃德先生
 * @微信公众号 哈喽沃德先生
 * @website https://mrhelloworld.com
 * @wechat 124059770
 */
@RestController
@RequestMapping("order")
public class OrderController {

    @Resource
    private OrderService orderService;

    /**
     * 提交订单
     *
     * @param order
     * @return
     */
    @PostMapping("save")
    public Map<String, Object> send(Order order) {
        return orderService.saveOrder(order);
    }

}
|
detail.html
在 list.html 中使用 CDN 添加 Vue 和 Axios 免去下载文件的过程。
1
2
|
<script src="https://cdn.jsdelivr.net/npm/vue@2.6.12/dist/vue.min.js"></script>
<script src="https://cdn.jsdelivr.net/npm/axios@0.21.1/dist/axios.min.js"></script>
|
页面处理
修改原价购买(善于利用 Ctrl + F)的 div:
div 添加 id="app"- 原价购买的父
<a> 标签添加 v-on:click="buy",简写方式 @:click="buy"
 1
 2
 3
 4
 5
 6
 7
 8
 9
10
|
<div id="app">
<a v-on:click="buy" href="javascript:void(0);" class="kt_item kt_item_buy ">
<div class="kt_price"><b>¥16.80</b> / 700g~800g</div>
<div class="kt_btn" id="tuan_one_number">原价购买</div>
</a>
<a href="javascript:void(0);" class="kt_item">
<div class="kt_price"><b>¥14.00</b> / 700g~800g</div>
<div class="kt_btn">立即拼团<br></div>
</a>
</div>
|
Vue and Axios
初始化 Vue 对象,绑定元素,定义组件方法。
 1
 2
 3
 4
 5
 6
 7
 8
 9
10
11
12
13
14
15
16
17
18
19
20
21
22
23
24
25
26
|
<script>
  // Vue 实例
  var app = new Vue({
    // element 的简写,挂载元素,绑定 id 为 app 的 html 代码片段
    el: '#app',
    // 定义组件数据
    data: {},
    // 定义组件方法
    methods: {
      buy() {
        axios({
          url: "/order/save",
          method: "POST",
          params: {userId: 5} // 模拟用户ID
        }).then(response => { // 返回结果
          alert(response.data.message);
          if (response.data.code == 200) {
            window.location.href = "pay.html";
          }
        }).catch(error => {// 异常捕获
          alert('系统正在升级中,请稍后再试!');
        });
      }
    }
  });
</script>
|
测试
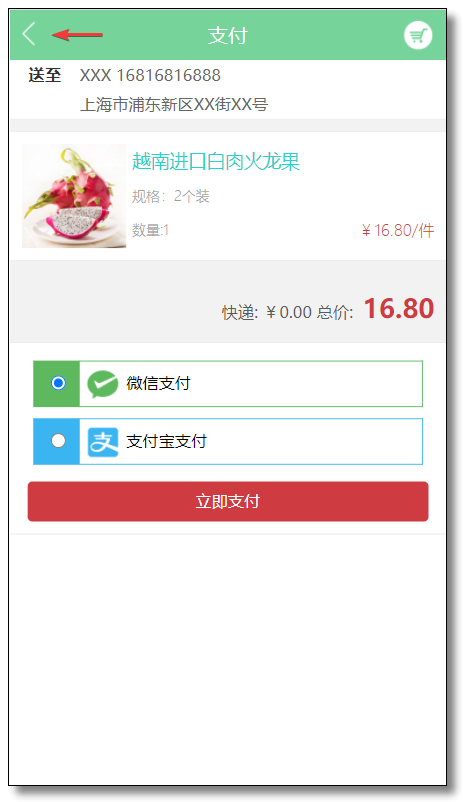
访问:http://localhost:8080/detail.html 点击 原价购买 按钮进行下单,然后跳转支付页面。
支付页面无需支付,点击左上角返回。
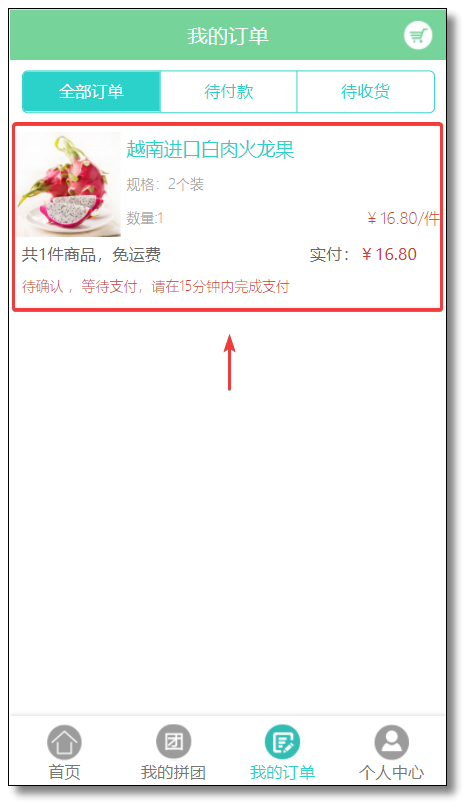
数据库如下,说明下单成功。
查询订单
需求说明
用户点击我的订单时调用后台接口根据用户ID查询订单列表,前端使用 Vue and Axios 进行处理。
OrderMapper.java
1
2
3
4
5
6
7
8
9
|
/**
 * 根据用户ID查询订单列表
 *
 * @param userId
 * @return
 */
@Select("SELECT order_id, order_sn, user_id, order_status, shipping_status, pay_status, order_time " +
        " FROM `order` WHERE user_id = #{userId}")
List<Order> selectOrderByUserId(@Param("userId") Integer userId);
|
OrderService.java
1
2
3
4
5
6
7
8
9
|
/**
 * 根据用户ID查询订单列表
 *
 * @param userId
 * @return
 */
public List<Order> selectOrderByUserId(Integer userId) {
    return orderMapper.selectOrderByUserId(userId);
}
|
OrderController.java
 1
 2
 3
 4
 5
 6
 7
 8
 9
10
|
/**
 * 根据用户ID查询订单列表
 *
 * @param userId
 * @return
 */
@GetMapping("list/{userId}")
public List<Order> selectOrderByUserId(@PathVariable Integer userId) {
    return orderService.selectOrderByUserId(userId);
}
|
my_order.html
在 my_order.html 中使用 CDN 添加 Vue 和 Axios 免去下载文件的过程。
1
2
|
<script src="https://cdn.jsdelivr.net/npm/vue@2.6.12/dist/vue.min.js"></script>
<script src="https://cdn.jsdelivr.net/npm/axios@0.21.1/dist/axios.min.js"></script>
|
Vue and Axios
初始化 Vue 对象,绑定元素,定义组件方法。
 1
 2
 3
 4
 5
 6
 7
 8
 9
10
11
12
13
14
15
16
17
18
19
20
21
22
23
24
25
26
27
28
29
|
<script>
  // 声明订单状态
  const orderStatus = {
    0: "待确认", 1: "已确认", 2: "已收货",
    3: "已取消", 4: "已完成", 5: "已作废"
  };
  // 声明支付状态
  const payStatus = {0: "等待支付", 1: "已支付", 2: "部分支付"};
  // Vue 实例
  var app = new Vue({
    // element 的简写,挂载元素,绑定 id 为 app 的 html 代码片段
    el: "#app",
    // 定义组件数据
    data: {
      orderList: []
    },
    // Vue 实例挂载后被立即调用
    mounted: function () {
      axios({
        url: "/order/list/" + 5, // 模拟用户ID
        method: "GET"
      }).then(response => { // 返回结果
        this.orderList = response.data;
      }).catch(error => {// 异常捕获
        alert("系统正在升级中,请稍后再试!");
      });
    }
  });
</script>
|
绑定元素
搜索 class="myorder-content" 的 div 元素添加 id="app":
1
2
3
|
<div id="app" class="myorder-content">
  ...
</div>
|
修改 id="app" 的 div 元素中的第一个 <li></li> 元素:
- 列表渲染:
<li></li> 添加 v-for="order in orderList"
- 商品详情地址:
v-bind:href="['order_details.html?orderSn=' + order.orderSn]"(本文重点在于后台业务实现,前端本着从简原则)
- 订单状态:
{{ orderStatus[order.orderStatus] }}
- 支付状态:
v-if="order.payStatus == 0 && order.orderStatus == 0"(订单状态为 0 待确认,支付状态为 0 等待支付则显示){{ payStatus[order.payStatus] }}
 1
 2
 3
 4
 5
 6
 7
 8
 9
10
11
12
13
14
15
16
17
18
19
20
21
22
23
24
25
26
27
28
|
<li class="mc-all cc-one tab_content show">
  <ul>
    <li v-for="order in orderList">
      <a v-bind:href="['order_details.html?orderSn=' + order.orderSn]">
        <div class="mc-sum-box">
          <div class="myorder-sum fl"><img src="images/pay1.jpg"></div>
          <div class="myorder-text">
            <h1>越南进口白肉火龙果</h1>
            <h2>规格:2个装</h2>
            <div class="myorder-cost">
              <span>数量:1</span>
              <span class="mc-t">¥16.80/件</span>
            </div>
          </div>
        </div>
        <div class="mc-sum-Am">
          共1件商品,免运费<span>实付:<span class="mc-t">¥16.80</span></span>
        </div>
        <h3>
          <span>{{ orderStatus[order.orderStatus] }}</span>
          <span v-if="order.payStatus == 0 && order.orderStatus == 0">
            ,{{ payStatus[order.payStatus] }},请在15分钟内完成支付
          </span>
        </h3>
      </a>
    </li>
  </ul>
</li>
|
测试
访问:http://localhost:8080/my_order.html
订单详情
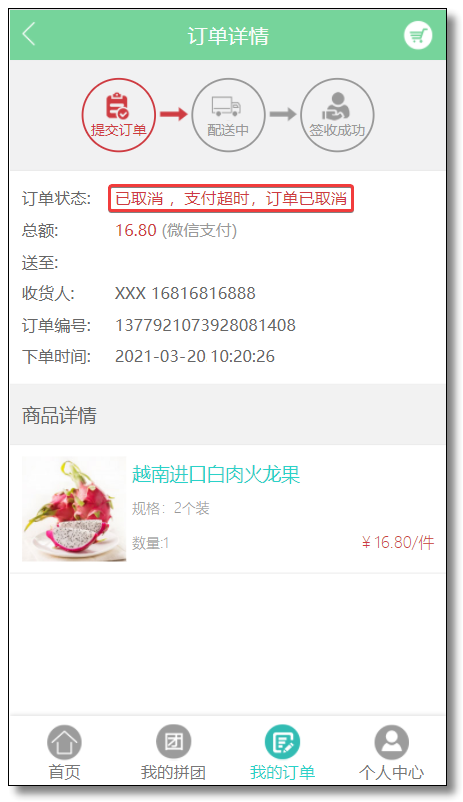
需求说明
用户点击对应的订单,调用后台接口根据订单编号查询订单详情,如果是等待支付状态,则显示超时时间。前端使用 Vue and Axios 进行处理。
OrderMapper.java
1
2
3
4
5
6
7
8
9
|
/**
 * 根据订单编号查询订单
 *
 * @param orderSn
 * @return
 */
@Select("SELECT order_id, order_sn, user_id, order_status, shipping_status, pay_status, order_time " +
        " FROM `order` WHERE order_sn = #{orderSn}")
Order selectOrderByOrderSn(@Param("orderSn") String orderSn);
|
OrderService.java
1
2
3
4
5
6
7
8
9
|
/**
 * 根据订单编号查询订单
 *
 * @param orderSn
 * @return
 */
public Order selectOrderByOrderSn(String orderSn) {
    return orderMapper.selectOrderByOrderSn(orderSn);
}
|
OrderController.java
 1
 2
 3
 4
 5
 6
 7
 8
 9
10
|
/**
 * 根据订单编号查询订单
 *
 * @param orderSn
 * @return
 */
@GetMapping("{orderSn}")
public Order selectOrderByOrderSn(@PathVariable String orderSn) {
    return orderService.selectOrderByOrderSn(orderSn);
}
|
order_details.html
在 order_details.html 中使用 CDN 添加 Vue 和 Axios 免去下载文件的过程。
1
2
|
<script src="https://cdn.jsdelivr.net/npm/vue@2.6.12/dist/vue.min.js"></script>
<script src="https://cdn.jsdelivr.net/npm/axios@0.21.1/dist/axios.min.js"></script>
|
Vue and Axios
初始化 Vue 对象,绑定元素,定义组件方法。
 1
 2
 3
 4
 5
 6
 7
 8
 9
10
11
12
13
14
15
16
17
18
19
20
21
22
23
24
25
26
27
28
29
30
31
32
33
34
35
36
37
38
39
40
41
42
43
44
45
46
47
48
49
50
51
52
53
54
55
56
57
58
59
60
61
62
63
64
65
66
67
68
69
70
71
72
73
74
75
76
77
78
79
80
81
|
<script>
  // 声明订单状态
  const orderStatus = {
    0: "待确认", 1: "已确认", 2: "已收货",
    3: "已取消", 4: "已完成", 5: "已作废"
  };
  // 声明支付状态
  const payStatus = {0: "等待支付", 1: "已支付", 2: "部分支付"};
  // Vue 实例
  var app = new Vue({
    // element 的简写,挂载元素,绑定 id 为 app 的 html 代码片段
    el: '#app',
    // 定义组件数据
    data: {
      order: [],
      orderTime: [],
      countdownTime: []
    },
    // Vue 实例挂载后被立即调用
    mounted: function () {
      // 获取订单编号(前端编写的比较简单,主要是为了跑通流程)
      let orderSn;
      let url = window.location.search; // 获取url中"?"符后的字串
      if (url.indexOf("?") != -1) {
        orderSn = url.substr(url.indexOf("=") + 1);
      }
      // 根据订单编号查询订单
      axios({
        url: "/order/" + orderSn,
        method: "GET"
      }).then(response => { // 返回结果
        this.order = response.data;
        this.orderTime = response.data.orderTime;
        // 倒计时
        this.countdown();
      }).catch(error => {// 异常捕获
        alert('系统正在升级中,请稍后再试!');
      });
    },
    methods: {
      // 倒计时
      countdown() {
        // 下单时间
        let orderTime = new Date(this.orderTime);
        // 超时时间
        let end = orderTime.setMinutes(orderTime.getMinutes() + 15);
        // 当前时间
        let now = Date.parse(new Date());
        // 剩余时间
        let second = end - now;
        if (second < 0) {
          return;
        }
        // 计算剩余日、时、分、秒
        let day = parseInt(second / 1000 / 60 / 60 / 24);
        let hours = parseInt(second / 1000 / 60 / 60 % 24);
        let min = parseInt(second / 1000 / 60 % 60);
        let sec = parseInt(second / 1000 % 60);
        if (min < 10) {
          min = "0" + min;
        }
        if (sec < 10) {
          sec = "0" + sec;
        }
        // 将计算结果赋值给倒计时变量
        this.countdownTime = min + ":" + sec;
        let that = this;
        if (min >= 0 && sec >= 0) {
          // 倒计时结束修改订单状态为已取消
          if (min == 0 && sec == 0) {
            this.order.orderStatus = 3;
            return;
          }
          setTimeout(function () {
            that.countdown();
          }, 1000);
        }
      }
    }
  });
</script>
|
绑定元素
修改 订单详情(善于利用 Ctrl + F):
- div 添加
id="app"
- 订单状态:
{{ orderStatus[order.orderStatus] }}
- 支付状态:
v-if="order.payStatus == 0 && order.orderStatus == 0"(订单状态为 0 待确认,支付状态为 0 等待支付则显示){{ payStatus[order.payStatus] }}
- 倒计时:
{{ countdownTime }}
- 订单超时:
v-if="order.orderStatus == 3 && order.payStatus == 0"(订单状态为 3 已取消,支付状态为 0 等待支付则显示)支付超时,订单已取消
 1
 2
 3
 4
 5
 6
 7
 8
 9
10
11
12
13
14
15
16
17
18
19
20
21
22
23
24
25
26
27
28
29
30
31
32
33
34
35
36
37
|
<!-- 订单信息 -->
<div id="app" class="od-infor">
  <table cellpadding="1" cellspacing="0">
    <tr>
      <td width="80px;">订单状态:</td>
      <td class="od-red">
        <span style="color: #CE3B41;">{{ orderStatus[order.orderStatus] }}</span>
        <span v-if="order.orderStatus == 0 && order.payStatus == 0" style="color: #CE3B41;">
          ,{{ payStatus[order.payStatus] }},剩余:{{ countdownTime }}
        </span>
        <span v-if="order.orderStatus == 3 && order.payStatus == 0" style="color: #CE3B41;">
          ,支付超时,订单已取消
        </span>
      </td>
    </tr>
    <tr>
      <td>总额:</td>
      <td class="od-red">16.80 <span>(微信支付)</span></td>
    </tr>
    <tr>
      <td>送至:</td>
      <td></td>
    </tr>
    <tr>
      <td>收货人:</td>
      <td>XXX 16816816888</td>
    </tr>
    <tr>
      <td>订单编号:</td>
      <td>{{ order.orderSn }}</td>
    </tr>
    <tr>
      <td>下单时间:</td>
      <td>{{ order.orderTime }}</td>
    </tr>
  </table>
</div>
|
测试
访问:http://localhost:8080/my_order.html 然后点击刚才的订单进入订单详情页。
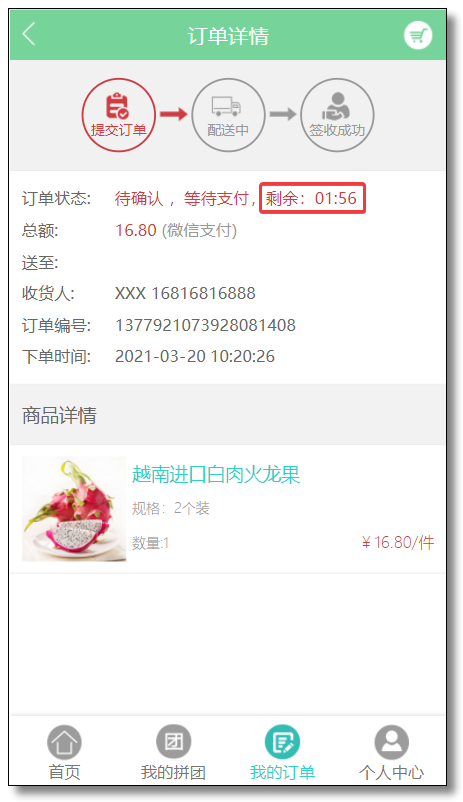
订单详情如下,倒计时等待支付。
订单超时
需求说明
用户下单以后未进行支付操作,订单处于待确认状态,支付处于等待支付状态,订单超时时间 15 分钟,前端显示倒计时提醒。倒计时结束订单超时,通过 RabbitMQ 完成订单的状态修改,并给订单操作表中添加对应的订单操作记录。
注意:RabbitMQ 需要提前安装好 rabbitmq_delayed_message_exchange 插件。不会安装的同学请参考上一篇:为什么我推荐你使用 RabbitMQ 实现订单超时处理(一)
OrderMapper.java
1
2
3
4
5
6
7
8
|
/**
 * 根据订单编号修改订单状态
 *
 * @param order
 * @return
 */
@Update("UPDATE `order` SET order_status = #{orderStatus} WHERE order_sn = #{orderSn}")
Integer updateOrderStatusByOrderSn(Order order);
|
OrderActionMapper.java
1
2
3
4
5
6
7
8
9
|
/**
 * 新增订单操作
 *
 * @param orderAction
 * @return
 */
@Insert("INSERT INTO order_action (order_sn, action_user, order_status, action_note, action_time, status_desc) " +
        " VALUES (#{orderSn}, #{actionUser}, #{orderStatus}, #{actionNote}, #{actionTime}, #{statusDesc})")
Integer save(OrderAction orderAction);
|
RabbitMQ 配置类
 1
 2
 3
 4
 5
 6
 7
 8
 9
10
11
12
13
14
15
16
17
18
19
20
21
22
23
24
25
26
27
28
29
30
31
32
33
34
35
36
37
38
39
40
41
42
43
44
45
46
47
48
49
50
51
52
53
54
55
56
57
|
package com.example.config;

import org.springframework.amqp.core.Binding;
import org.springframework.amqp.core.BindingBuilder;
import org.springframework.amqp.core.CustomExchange;
import org.springframework.amqp.core.Queue;
import org.springframework.beans.factory.annotation.Qualifier;
import org.springframework.context.annotation.Bean;
import org.springframework.context.annotation.Configuration;

import java.util.HashMap;
import java.util.Map;

/**
 * @author 哈喽沃德先生
 * @微信公众号 哈喽沃德先生
 * @website https://mrhelloworld.com
 * @wechat 124059770
 */
@Configuration
public class RabbitMQConfiguration {

    // 交换机
    public static final String DELAY_EXCHANGE = "delay.exchange";
    // 队列
    public static final String DELAY_QUEUE = "delay.queue";
    // 队列路由Key
    public static final String DELAY_QUEUE_ROUTING_KEY = "delay.queue.routingkey";

    // 声明队列
    @Bean("delayQueue")
    public Queue delayQueue() {
        return new Queue(DELAY_QUEUE);
    }

    // 声明交换机,延迟消息由 rabbitmq_delayed_message_exchange 插件实现
    /*
        安装插件后会生成新的 Exchange 类型 x-delayed-message,
        该类型消息支持延迟投递机制,接收到消息后并未立即将消息投递至目标队列,
        而是存储在 mnesia(一个分布式数据系统) 表中。
        监测消息延迟时间,如达到可投递时间将其通过 x-delayed-type 类型的交换机投递至目标队列。
     */
    @Bean("delayExchange")
    public CustomExchange delayExchange() {
        Map<String, Object> args = new HashMap<>();
        args.put("x-delayed-type", "direct");
        return new CustomExchange(DELAY_EXCHANGE, "x-delayed-message", true, false, args);
    }

    // 声明队列的绑定关系
    @Bean
    public Binding delayBinding(@Qualifier("delayQueue") Queue queue,
                                @Qualifier("delayExchange") CustomExchange delayExchange) {
        return BindingBuilder.bind(queue).to(delayExchange).with(DELAY_QUEUE_ROUTING_KEY).noargs();
    }

}
|
消息生产者
 1
 2
 3
 4
 5
 6
 7
 8
 9
10
11
12
13
14
15
16
17
18
19
20
21
22
23
24
25
26
27
28
29
30
31
32
33
34
35
|
package com.example.producer;

import lombok.extern.slf4j.Slf4j;
import org.springframework.amqp.rabbit.core.RabbitTemplate;
import org.springframework.stereotype.Component;

import javax.annotation.Resource;
import java.time.LocalDateTime;

import static com.example.config.RabbitMQConfiguration.DELAY_EXCHANGE;
import static com.example.config.RabbitMQConfiguration.DELAY_QUEUE_ROUTING_KEY;

/**
 * @author 哈喽沃德先生
 * @微信公众号 哈喽沃德先生
 * @website https://mrhelloworld.com
 * @wechat 124059770
 */
@Slf4j
@Component
public class DelayMessageProducer {

    @Resource
    private RabbitTemplate rabbitTemplate;

    public void send(String message, Integer delayTime) {
        log.info("当前时间:{},订单编号:{},延迟时间:{}", LocalDateTime.now(), message, delayTime);
        rabbitTemplate.convertAndSend(DELAY_EXCHANGE, DELAY_QUEUE_ROUTING_KEY, message, msg -> {
            // 设置消息的延迟时间
            msg.getMessageProperties().setDelay(delayTime);
            return msg;
        });
    }

}
|
消息消费者
 1
 2
 3
 4
 5
 6
 7
 8
 9
10
11
12
13
14
15
16
17
18
19
20
21
22
23
24
25
26
27
28
29
30
31
32
33
34
35
36
37
38
39
40
41
42
43
44
45
46
47
48
49
50
51
52
53
54
55
56
57
58
59
60
61
62
63
64
65
66
67
68
69
70
71
72
73
|
package com.example.consumer;

import com.example.enums.OrderStatus;
import com.example.enums.PayStatus;
import com.example.mapper.OrderActionMapper;
import com.example.mapper.OrderMapper;
import com.example.pojo.Order;
import com.example.pojo.OrderAction;
import com.rabbitmq.client.Channel;
import lombok.extern.slf4j.Slf4j;
import org.springframework.amqp.core.Message;
import org.springframework.amqp.rabbit.annotation.RabbitListener;
import org.springframework.stereotype.Component;

import javax.annotation.Resource;
import java.time.LocalDateTime;
import java.util.Date;

import static com.example.config.RabbitMQConfiguration.DELAY_QUEUE;

/**
 * @author 哈喽沃德先生
 * @微信公众号 哈喽沃德先生
 * @website https://mrhelloworld.com
 * @wechat 124059770
 */
@Slf4j
@Component
public class DelayQueueConsumer {

    @Resource
    private OrderMapper orderMapper;
    @Resource
    private OrderActionMapper orderActionMapper;

    /**
     * 订单超时处理 - 取消订单
     * 根据订单编号查询订单,如果是等待支付状态,取消订单并修改状态
     *
     * @param message
     * @param channel
     */
    @RabbitListener(queues = DELAY_QUEUE) // 监听队列
    public void cancelOrder(Message message, Channel channel) {
        String orderSn = new String(message.getBody());
        log.info("当前时间:{},延迟队列收到订单编号:{}", LocalDateTime.now(), orderSn);
        // 根据订单编号查询订单
        Order order = orderMapper.selectOrderByOrderSn(orderSn);
        // 如果订单不为空且支付状态为等待支付
        if (order != null && PayStatus.no_pay.getStatus().equals(order.getPayStatus())) {
            // 设置订单状态为 3 已取消
            order.setOrderStatus(OrderStatus.cancel.getStatus());
            // 根据订单编号修改订单状态
            Integer result = orderMapper.updateOrderStatusByOrderSn(order);
            if (result > 0) {
                OrderAction orderAction = new OrderAction();
                // 订单编号
                orderAction.setOrderSn(orderSn);
                // 订单状态 3 已取消
                orderAction.setOrderStatus(OrderStatus.cancel.getStatus());
                // 操作记录
                orderAction.setActionNote("支付超时,订单已取消");
                // 操作时间
                orderAction.setActionTime(new Date());
                // 状态描述
                orderAction.setStatusDesc("支付超时,订单已取消");
                // 新增订单操作
                orderActionMapper.save(orderAction);
            }
        }
    }

}
|
修改新增订单
添加代码:发送消息至队列。
 1
 2
 3
 4
 5
 6
 7
 8
 9
10
11
12
13
14
15
16
17
18
19
20
21
22
23
24
25
26
27
28
29
30
31
32
33
34
35
36
|
@Resource
private DelayMessageProducer producer; // 延迟消息生成者
@Value("${order.delay.time}")
private Integer orderDelayTime; // 订单延迟时间

/**
 * 提交订单
 *
 * @param order
 * @return
 */
@Transactional
public Map<String, Object> saveOrder(Order order) {
    // 订单编号
    order.setOrderSn(IdUtil.getSnowflake(1, 1).nextIdStr());
    // 订单状态 0 待确认
    order.setOrderStatus(OrderStatus.no_confirm.getStatus());
    // 支付状态 0 等待支付
    order.setPayStatus(PayStatus.no_pay.getStatus());
    // 下单时间
    order.setOrderTime(new Date());
    // 新增订单
    Integer result = orderMapper.save(order);
    // 返回结果
    Map<String, Object> map = new HashMap<>();
    if (result > 0) {
        map.put("code", 200);
        map.put("message", "订单已提交");
        // 发送消息至队列,设置消息的延迟时间
        producer.send(order.getOrderSn(), orderDelayTime);
    } else {
        map.put("code", 400);
        map.put("message", "订单提交失败");
    }
    return map;
}
|
测试
为了方便测试,配置文件中订单延迟时间设置短一点(两分钟):
1
2
3
|
order:
  delay:
    time: 120000 # 订单延迟时间,单位毫秒
|
前端的延迟时间也设置短一点(两分钟):
1
2
|
// 超时时间
let end = orderTime.setMinutes(orderTime.getMinutes() + 2);
|
访问:http://localhost:8080/index.html 重新走一遍刚才的下单流程,等待超时处理。
下单以后,前端显示如下:
下单以后,数据库如下:
下单以后,消息生产者日志记录如下:
1
|
c.example.producer.DelayMessageProducer : 当前时间:2021-03-15T10:20:26.222289300,订单编号:1377921073928081408,延迟时间:120000
|
订单超时以后,消息消费者日志记录如下:
1
|
com.example.consumer.DelayQueueConsumer : 当前时间:2021-03-15T10:22:26.242463200,延迟队列收到订单编号:1377921073928081408
|
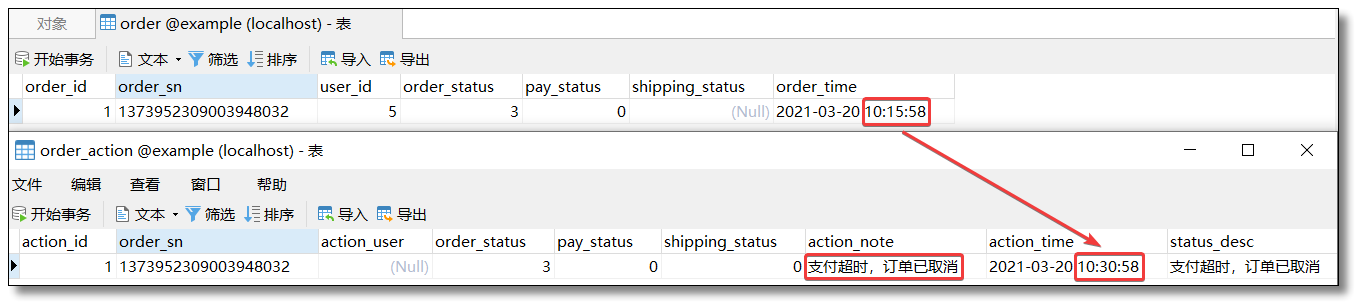
订单超时以后,订单表数据如下:
订单超时以后,订单操作表数据如下:
订单超时以后,前端显示如下:
结语
至此 RabbitMQ 的实战小项目《订单超时处理》就完成啦,本文讲解了 Spring Boot 整合 RabbitMQ 的使用,顺便结合前端 Vue 实现了页面效果。作为一款非常热门的消息中间件,大家非常有必要进行更深入的学习,最后祝大家加薪!加薪!加薪!
温馨提示:本案例图文并茂,代码齐全(包括前端)大家只需要跟着文章一步步学习即可实现。想要一步到位直接获取代码的同学,请关注微信公众号「哈喽沃德先生」回复 ordertimeout 即可。
参考
本文采用 知识共享「署名-非商业性使用-禁止演绎 4.0 国际」许可协议。
大家可以通过 分类 查看更多关于 RabbitMQ 的文章。
🤗 您的点赞和转发是对我最大的鼓励和支持。
📢 扫码关注 哈喽沃德先生「文档 + 视频」每篇文章都配有专门视频讲解,学习更轻松噢 ~